what is the best approach for assigning permission levels in SharePoint?
One recommendation is to use AD groups or SharePoint groups that contain AD groups rather than individuals to control access. It's much easier to clean up AD group membership when an individual leaves than to track down all the places where you've given them individual access (including membership in SharePoint groups).
Showing posts with label MOSS 2007. Show all posts
Showing posts with label MOSS 2007. Show all posts
_spbodyonloadfunctionnames is undefined Javascript Error in sharepoint
Tags:
MOSS 2007,
Sharepoint
_spBodyOnLoadFunctionNames: Generally, ASP.NET 2.0 Master page concept is used for sharepoint pages and the “body ” is defined in master page. So, the content page is not able to add function to the body’s onload event directly. In order to work around this limitation, SharePoint provides the “_spBodyOnLoadFunctionNames” array. When the body is loaded, the onload event handler executes each function whose name is contained in this array. We added “myFunction” to the array so that it would run when the body’s onload event fires.
_spBodyOnLoadFunctionNames.push("myFunction ");
_spBodyOnLoadFunctionNames.push("myFunction ");
Add/Remove Assembly to WSP (VSEWSS)
Tags:
MOSS 2007,
Sharepoint,
VSeWSS
I was facing a problem to add an assembly in VSEWSS generated WSP. I added assembly in “manifest.xml” but it is refreshed during packaging. I added assembly in VS but it was not included in WSP. There is no direct way to access ddf in VSEWSS. At Last, I got solution:
Default view metadata(columns) in sharepoint custom search result page
Tags:
MOSS 2007,
Sharepoint
Generally, it is required to search in a document library and display default view columns in search result. I read different articles for this. I like this article and updated for MOSS 2007.
There are following steps in the code:
There are following steps in the code:
SPContext.Current.Site = NullReferenceException for asp.net page in sharepoint
Tags:
MOSS 2007,
Sharepoint
To run asp.net application in the SharePoint context, it should be copied into the C:\Program Files\Common Files\Microsoft Shared\web server extensions\12\TEMPLATE\LAYOUTS directory. If it belongs to different box then SPContext.Current.Site will not work. If ASP.net page is opened from SharePoint context then try following:
Add custom field type to sharepoint list and set CustomProperty using c#
Tags:
MOSS 2007,
Sharepoint
Object: To add custom column type in sharepoint list and set property (Say: MyProperty1) of custom column type.
Solution: We can add column easily using c# but there is no direct way to set custom property of custom column type, Because SetCustomProperty is not working. Also, there is no error if we use it.
See following example to add a column (CustomFieldType1 type) with property “MyProperty1”. I used AddFieldAsXml method and column name & property value are assigned from the controls.
Solution: We can add column easily using c# but there is no direct way to set custom property of custom column type, Because SetCustomProperty is not working. Also, there is no error if we use it.
See following example to add a column (CustomFieldType1 type) with property “MyProperty1”. I used AddFieldAsXml method and column name & property value are assigned from the controls.
string pageurl = @"http://server/site/Forms/AllItems.aspx";
        string lstguid = "{fe4b12b6-1032-409d-84a3-63647cf7b770}";
        using (SPWeb oWebsite = new SPSite(pageurl).OpenWeb())
        {
            SPList oList = oWebsite.Lists[new Guid(lstguid)];
            if (!oList.Fields.ContainsField(txt.Text))
            {
                string strxml = "<Field Type=\"CustomFieldType1\" DisplayName=\""+ txt.Text +"\" Name=\""+ txt.Text +"\"><Customization><ArrayOfProperty><Property><Name>MyProperty1</Name><Value xmlns:q1=\"http://www.w3.org/2001/XMLSchema\" p4:type=\"q1:string\" xmlns:p4=\"http://www.w3.org/2001/XMLSchema-instance\">"+ ddl.SelectedValue.ToString() +"</Value></Property></ArrayOfProperty></Customization></Field>";
                oWebsite.Site.WebApplication.FormDigestSettings.Enabled = false;
                oList.Fields.AddFieldAsXml(strxml, true, SPAddFieldOptions.Default);
                oList.Update();
                oWebsite.Site.WebApplication.FormDigestSettings.Enabled = true;
            }

        }
Deploy VSeWSS project on production server without VS
Tags:
MOSS 2007,
Sharepoint,
VSeWSS
Suppose your production and development server are different and production server is not accessible from the development server. There is no visual studio on the production server and you have to deploy your custom code on the production server. Then see following steps:
1. Build the project on the development server. It will create .wsp and setup.bat files.
2. Copy the project bin\debug folder and put it in the production server.
3. Open command prompt and go to the bin\debug path (copied files path) in the production server.
4. If it is the first time of installation then run “setup.bat /install” command.
If it is already installed then we need to first uninstall then install otherwise you will get error the files and folders are already exist in current sharepoint.
To Uninstall, run “setup.bat /uninstall”
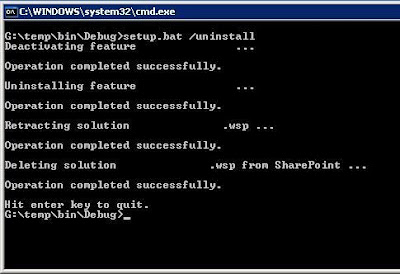
And then to install, run “setup.bat /install” command.

Hope! It helps you.
1. Build the project on the development server. It will create .wsp and setup.bat files.
2. Copy the project bin\debug folder and put it in the production server.
3. Open command prompt and go to the bin\debug path (copied files path) in the production server.
4. If it is the first time of installation then run “setup.bat /install” command.
If it is already installed then we need to first uninstall then install otherwise you will get error the files and folders are already exist in current sharepoint.
To Uninstall, run “setup.bat /uninstall”

And then to install, run “setup.bat /install” command.

Hope! It helps you.
Customize custom field displaypattern to pass current item info to another page in MOSS 2007
Tags:
MOSS 2007,
Sharepoint
Suppose we have a custom field and we want to edit it on another page, not in default edit page. Then we need to pass current item information to that page which should be able to access and edit the field.Generally, it is required because we can’t edit item in the listview.CAML is used in the display pattern.
Assume the custom edit page(editme.aspx) is deployed on main site, then first we require host address in display pattern, For this use <HttpHost /> element and after this give page name(editme.aspx).
Output: http://server/editme.aspx
Now we will pass following parameters in query string:
ID: <Column Name="ID" />
fieldName: <Property Select="Name" />
ListGUID: <List/>
PageURL:
<ScriptQuote NotAddingQuote="TRUE">
<PageUrl URLEncode="TRUE"/>
</ScriptQuote>
These information(ID,fieldName,ListGUIDand PageURL) are sufficient to edit this item. The complete code looks like:
In editme.aspx page:
On clicking custom field item in listview, editme.aspx page will be opened and value is replaced with “Sample Value”.
Hope ! it helps.
Assume the custom edit page(editme.aspx) is deployed on main site, then first we require host address in display pattern, For this use <HttpHost /> element and after this give page name(editme.aspx).
Output: http://server/editme.aspx
Now we will pass following parameters in query string:
ID: <Column Name="ID" />
fieldName: <Property Select="Name" />
ListGUID: <List/>
PageURL:
<ScriptQuote NotAddingQuote="TRUE">
<PageUrl URLEncode="TRUE"/>
</ScriptQuote>
These information(ID,fieldName,ListGUIDand PageURL) are sufficient to edit this item. The complete code looks like:
<RenderPattern Name="DisplayPattern">
    <HTML>
     <![CDATA[<a href="javascript: void(0)"
   onclick="window.open(']]></HTML>
    <HttpHost />
    <HTML><![CDATA[/editme.aspx?ID=]]></HTML>
    <Column Name="ID" />
    <HTML><![CDATA[&fieldName=]]></HTML>
    <Property Select="Name" />
    <HTML><![CDATA[&listguid=]]></HTML>
    <List/>
    <HTML><![CDATA[&pageurl=]]></HTML>
    <ScriptQuote NotAddingQuote="TRUE">
     <PageUrl URLEncode="TRUE"/>
    </ScriptQuote>

    <HTML><![CDATA[')">]]></HTML>
    <Column HTMLEncode="TRUE" />
    <HTML><![CDATA[</a>]]></HTML>
   </RenderPattern>
In editme.aspx page:
string pageurl = Request["pageurl"].ToString();
string fieldName = Request["fieldName "].ToString();
string lstguid = = Request["listguid"].ToString();
int itemID = Convert.ToInt32(Request["ID"]);
        using (SPWeb oWebsite = new SPSite(pageurl).OpenWeb())
        {
            SPList oList = oWebsite.Lists[new Guid(lstguid)];
            SPListItem oListItem = oList.GetItemById(itemID);
            oListItem[fieldName] = "Sample Value";
            oWebsite.AllowUnsafeUpdates = true;
            oListItem.Update();
        }
On clicking custom field item in listview, editme.aspx page will be opened and value is replaced with “Sample Value”.
Hope ! it helps.
Submit infopath form to MOSS 2007 form library using web service
Tags:
InfoPath,
MOSS 2007,
Sharepoint
Object:
1. Submit infopath form to sharepoint form library using code, so that custom validations can be implemented.
2. The submitted file name should be based on one of its internal field which would be unique.
3. File should be editable
Here are the basic steps to do this.
Step1: Create a Form Library in MOSS 2007 and go to settings > Form library settings > Advance settings> Select “Allow management of content types” yes and “display as a web page option” and Click ok.
Step 2: Create a web service and add following methods
Step 3: You need to set following parameter in the code
1. fieldName (in Save Method): Submitted File name is based on this field value. If it is null then new GUID will be used.
Step 4: Open infopath app click File > Design a Form Template
Select Form Template, Blank options and Check “Enable Browser-Compatible Features only” option and click OK.
Step 5: Draw layout, Add Controls and validation as per requirement.
Step 6: Tools > Data Connection > Add
Select “Create a new connection to” and “submit data” and Click Next.
Select “To a web service” option and Click Next
Give webservice url and Click Next
Select Save method and Click Next
Select Parameter, “Entire Form” option and “Submit Data as string” option

Click Next
Give Connection name and click Finish.
Note: This web service is deployed with MOSS services or this form is deployed in full trust mode then no problem else you need to convert data connection to UDCX files. For this, Tools> Data Connections >Select Connection > Click Convert button and give data connection url and Click OK.
Step 7: Tools > Submit options
Set “Allow users to submit this form” true, Select web service option from dropdown and Select Data connection which we made as per following image.

Click Advance button > Select “Close the form” in After submit option Click OK.
Step 8: File > Publish
Select “To a sharepoint server with or without form services” and click next
Give url of form library excluding “forms/allitems.aspx” and click next
Select “Enable this form to be filled out by using a browser” (Assume Domain level security in tools > form options>Security and trusts) Select Document Library and click Next.
Select Update the form template … option and select form library and click next
Add column names and click next
Click Publish button and close
Open Form Library and enjoy it.
1. Submit infopath form to sharepoint form library using code, so that custom validations can be implemented.
2. The submitted file name should be based on one of its internal field which would be unique.
3. File should be editable
Here are the basic steps to do this.
Step1: Create a Form Library in MOSS 2007 and go to settings > Form library settings > Advance settings> Select “Allow management of content types” yes and “display as a web page option” and Click ok.
Step 2: Create a web service and add following methods
[WebMethod]
    public string Save(string strdoc)
    {

        try
        {
            string fieldName = "f1";
            // Use elevated privileges so anonymous users can upload through
            // this service.
            SPSecurity.RunWithElevatedPrivileges(delegate { SubmitToSPLibrary(strdoc, fieldName); });
            return "";
        }
        catch (Exception ex)
        {
            Log(ex.ToString());
            return "error";
        }

    }
    public void Log(string str)
    {
        StreamWriter Tex = File.AppendText("c:\\Backuplog.txt");
        Tex.WriteLine(DateTime.Now.ToString() + " " + str);
        Tex.Close();
    }
    private void SubmitToSPLibrary(string formData, string field)
    {
        string namespaceURI = "";
        try
        {
            // With the form data submitted to this web service, we now
            // need to find the location for submitting list data.
            XmlDocument xmlDoc = new XmlDocument();
            xmlDoc.LoadXml(formData);
            //Get the namespace
            Match mn = Regex.Match(formData, "my=\"(.+?)\"");
            if (mn.Success && mn.Groups.Count > 1)
            {
                namespaceURI = mn.Groups[1].Value;
            }

            // Get the XSN location
            XmlProcessingInstruction pi =
               (XmlProcessingInstruction)xmlDoc.SelectSingleNode("/processing-instruction(\"mso-infoPathSolution\")");

            if (null != pi && !String.IsNullOrEmpty(pi.Value))
            {
                Match m = Regex.Match(pi.Value, "href=\"(.+?)\"");
                if (m.Success && m.Groups.Count > 1)
                {
                    string xsnLoc = m.Groups[1].Value;
                    if (!xsnLoc.StartsWith("http", StringComparison.OrdinalIgnoreCase) || !xsnLoc.ToLower().Contains("/forms/"))

                        throw new Exception("XSN location is not a published InfoPath document library.");

                    // Open the site and web, try to get the list.
                    Log("Site Address: " + xsnLoc);
                    using (SPSite site = new SPSite(xsnLoc))
                    {
                        using (SPWeb web = site.OpenWeb())
                        {
                            web.AllowUnsafeUpdates = true;
                            string libLoc = xsnLoc.Substring(0, xsnLoc.LastIndexOf("/Forms/"));
                            Log("Library Address: " + libLoc);

                            // Upload form data to the library.
                            SPFolder folder = web.GetFolder(libLoc);
                            if (null == folder)
                                throw new Exception("Cannot find the InfoPath document library root folder.");

                            UTF32Encoding encoder = new UTF32Encoding();
                            byte[] data = encoder.GetBytes(formData);

                            //Get File Name
                            XmlNodeList list = xmlDoc.GetElementsByTagName(field, namespaceURI);

                            string fileName = "";
                            foreach (XmlNode node in list)
                            {
                                fileName = node.InnerText;
                            }
                            if (fileName.Trim().Length > 0)
                            {
                                    //Add New File OR Update Existing one.
                                    folder.Files.Add(String.Format("{0}/{1}.xml", libLoc, fileName), data ,true);
                                    Log("Added Successfully.");
                            }
                            else
                            {
                                folder.Files.Add(String.Format("{0}/{1}.xml", libLoc, Guid.NewGuid()), data);
                            }
                            web.AllowUnsafeUpdates = false;
                        }

                    }

                }

            }

        }

        catch (Exception ex)
        {
            throw new Exception("Failed to upload form data", ex);
        }

    }
Step 3: You need to set following parameter in the code
1. fieldName (in Save Method): Submitted File name is based on this field value. If it is null then new GUID will be used.
Step 4: Open infopath app click File > Design a Form Template
Select Form Template, Blank options and Check “Enable Browser-Compatible Features only” option and click OK.
Step 5: Draw layout, Add Controls and validation as per requirement.
Step 6: Tools > Data Connection > Add
Select “Create a new connection to” and “submit data” and Click Next.
Select “To a web service” option and Click Next
Give webservice url and Click Next
Select Save method and Click Next
Select Parameter, “Entire Form” option and “Submit Data as string” option

Click Next
Give Connection name and click Finish.
Note: This web service is deployed with MOSS services or this form is deployed in full trust mode then no problem else you need to convert data connection to UDCX files. For this, Tools> Data Connections >Select Connection > Click Convert button and give data connection url and Click OK.
Step 7: Tools > Submit options
Set “Allow users to submit this form” true, Select web service option from dropdown and Select Data connection which we made as per following image.

Click Advance button > Select “Close the form” in After submit option Click OK.
Step 8: File > Publish
Select “To a sharepoint server with or without form services” and click next
Give url of form library excluding “forms/allitems.aspx” and click next
Select “Enable this form to be filled out by using a browser” (Assume Domain level security in tools > form options>Security and trusts) Select Document Library and click Next.
Select Update the form template … option and select form library and click next
Add column names and click next
Click Publish button and close
Open Form Library and enjoy it.
Common configuration errors in MOSS 2007
Tags:
MOSS 2007,
Sharepoint
Error: The backup/restore job failed because there is already another job scheduled. Delete the timer job from the Timer Job Definitions page, and then restart the backup/restore job.
Solution:
1. In Central Admin > Operations > Global Configuration, click on Timer job definitions.
2. Click the timer job with the title of "backup/restore."
3. Delete the timer job.

Now you can run the backup/ restore process.
Error: The EXECUTE permission was denied on the object 'proc_getNewObjects', database 'SharePoint_Config', schema 'dbo'. MOSS 2007 Error
Event ID: 5214
Solution:
Run MSSqlserver service as network account. For this
1. My Computer > Right click Select “Manage” > Services and Application > Services
2. Select MSSqlserver service >properties > Log On
If your installation is not single server farm then select “This Account” option and give domain user and password which has sufficient permission to access database.
See also: http://technet.microsoft.com/en-us/library/cc561019.aspx
Error Log:
Event Type: Error
Event Source: Windows SharePoint Services 3
Event Category: Database
Event ID: 3351
Date: 3/6/2008
Time: 12:45:30 AM
User: N/A
Computer: SERVER
Description:
SQL database login failed. Additional error information from SQL Server is included below.
Login failed for user 'NT AUTHORITY\ANONYMOUS LOGON'.
Solution: Run Timer service as network account in similar manner as in above problem.
Error: The search request was unable to connect to the Search Service.
Solution: See Here
Error: Access denied in Editing SPD workflow in MOSS 2007
Solution: 1. Go to Sharepoint designer-> workflow->RightClick->Properties->Security->Manage permission using the browser->set user permission(Approver)
2. Right click on workflow -> Publish files
3. IISRESET
Solution:
1. In Central Admin > Operations > Global Configuration, click on Timer job definitions.
2. Click the timer job with the title of "backup/restore."
3. Delete the timer job.

Now you can run the backup/ restore process.
Error: The EXECUTE permission was denied on the object 'proc_getNewObjects', database 'SharePoint_Config', schema 'dbo'. MOSS 2007 Error
Event ID: 5214
Solution:
Run MSSqlserver service as network account. For this
1. My Computer > Right click Select “Manage” > Services and Application > Services
2. Select MSSqlserver service >properties > Log On
If your installation is not single server farm then select “This Account” option and give domain user and password which has sufficient permission to access database.
See also: http://technet.microsoft.com/en-us/library/cc561019.aspx
Error Log:
Event Type: Error
Event Source: Windows SharePoint Services 3
Event Category: Database
Event ID: 3351
Date: 3/6/2008
Time: 12:45:30 AM
User: N/A
Computer: SERVER
Description:
SQL database login failed. Additional error information from SQL Server is included below.
Login failed for user 'NT AUTHORITY\ANONYMOUS LOGON'.
Solution: Run Timer service as network account in similar manner as in above problem.
Error: The search request was unable to connect to the Search Service.
Solution: See Here
Error: Access denied in Editing SPD workflow in MOSS 2007
Solution: 1. Go to Sharepoint designer-> workflow->RightClick->Properties->Security->Manage permission using the browser->set user permission(Approver)
2. Right click on workflow -> Publish files
3. IISRESET
Make search queries and indexing server on same machine for medium server farms in MOSS 2007
Tags:
MOSS 2007,
Sharepoint
Our object is to use medium server farm and configure server as both search queries and indexing server.
1. Make sure indexing service is started.
2. Go to Central Administration > Operations > topologies and services > Services on Server
Here we see five options:
Single Server or Web Server for small server farms (All services run on this server)
Web Server for medium server farms (Web application and Search Query services run on this server)
Search Indexing(Search Indexing service runs on this server)
Excel Calculation(Excel Calculation service runs on this server)
Custom (Services you choose run on this server)

3. Click “Office SharePoint Server Search”.

Select both checkboxes.
4. Set proper user.
Note: User must have sufficient privileges to access the SQL Server database.
Now your server is configured for both search queries and indexing server.
1. Make sure indexing service is started.
2. Go to Central Administration > Operations > topologies and services > Services on Server
Here we see five options:
Single Server or Web Server for small server farms (All services run on this server)
Web Server for medium server farms (Web application and Search Query services run on this server)
Search Indexing(Search Indexing service runs on this server)
Excel Calculation(Excel Calculation service runs on this server)
Custom (Services you choose run on this server)

3. Click “Office SharePoint Server Search”.

Select both checkboxes.
4. Set proper user.
Note: User must have sufficient privileges to access the SQL Server database.
Now your server is configured for both search queries and indexing server.
MOSS 2007 LOG
Tags:
MOSS 2007,
Sharepoint
There are two things:
1. What is the location of log files in MOSS 2007?
2. What is the size of MOSS Log? Generally It is in GB. So, How can we control it?
these are very basic but very useful.
Default Location: C:\Program Files\Common Files\Microsoft Shared\Web Server Extensions\12\LOGS\
In default settings, it takes some GBs per day.
Customizing log settings:
1. Goto Central Administration -> Operations -> Logging and Reporting -> Diagnostic logging
2. In Event Throttling:
Category: ALL
Trace log: verbose
3. In Trace Log:
You can change default location of logs. It is recommended to store log files in another drive.
Set number of log files: 12
Number of minutes to use a log file: 1440 (for 24 Hrs)
You can set according to your choice.
4. If you do not want to use the usage analysis features, you can turn off the usage analysis log to conserve hard-disk space
For this
Goto Central Administration -> Operations -> Logging and Reporting -> Usage analysis processing
Clear “Enable logging” option.
5. MOSS 2007 server installation has some log files held in C:\Documents and Settings\Default User\Local Settings\Temp and these are being written at regular intervals increasing its size. Worse still, because it’s in the C:\Documents and Settings\Default User folder it gets duplicated when a new user logs onto the server console. You can safely delete these files.
1. What is the location of log files in MOSS 2007?
2. What is the size of MOSS Log? Generally It is in GB. So, How can we control it?
these are very basic but very useful.
Default Location: C:\Program Files\Common Files\Microsoft Shared\Web Server Extensions\12\LOGS\
In default settings, it takes some GBs per day.
Customizing log settings:
1. Goto Central Administration -> Operations -> Logging and Reporting -> Diagnostic logging
2. In Event Throttling:
Category: ALL
Trace log: verbose
3. In Trace Log:
You can change default location of logs. It is recommended to store log files in another drive.
Set number of log files: 12
Number of minutes to use a log file: 1440 (for 24 Hrs)
You can set according to your choice.
4. If you do not want to use the usage analysis features, you can turn off the usage analysis log to conserve hard-disk space
For this
Goto Central Administration -> Operations -> Logging and Reporting -> Usage analysis processing
Clear “Enable logging” option.
5. MOSS 2007 server installation has some log files held in C:\Documents and Settings\Default User\Local Settings\Temp and these are being written at regular intervals increasing its size. Worse still, because it’s in the C:\Documents and Settings\Default User folder it gets duplicated when a new user logs onto the server console. You can safely delete these files.
How to Start or schedule crawling for searching in MOSS 2007
Tags:
MOSS 2007,
Sharepoint
If you don't see your item in search result in MOSS 2007 means your item has not been crawled. How can we do crawling manually or set schedule for this?
1. Open MOSS 2007 Central administration -> Application management -> Create or configure this farm's shared services in “Office SharePoint Server Shared Services” group.
2. Open shared service of your web application
3. Click on “search settings” in search group.
4. Click on “Content sources and crawl schedules” and open context menu of your content source.
5. In context menu you will get all options:
Edit
View Crawl Log
Start full Crawl
Start Incremental Crawl
Resume Crawl
Pause Crawl
Stop Crawl
Delete
You can start crawling manually but our aim is to set schedule so click on “Edit”, you will get two “Create Schedule” links, one for Full and another for Incremental crawling.
Click on link which you want to create schedule and give schedule type, time and repeat time(If you want).
Click OK and Enjoy it!!!
1. Open MOSS 2007 Central administration -> Application management -> Create or configure this farm's shared services in “Office SharePoint Server Shared Services” group.
2. Open shared service of your web application
3. Click on “search settings” in search group.
4. Click on “Content sources and crawl schedules” and open context menu of your content source.
5. In context menu you will get all options:
Edit
View Crawl Log
Start full Crawl
Start Incremental Crawl
Resume Crawl
Pause Crawl
Stop Crawl
Delete
You can start crawling manually but our aim is to set schedule so click on “Edit”, you will get two “Create Schedule” links, one for Full and another for Incremental crawling.
Click on link which you want to create schedule and give schedule type, time and repeat time(If you want).
Click OK and Enjoy it!!!
Convert Team site / blank site to a publishing site in MOSS 2007
Tags:
MOSS 2007,
Sharepoint
Publishing Site vs. Team Site
When you first start using SharePoint you most likely will first have a SharePoint Team Site. This is a template that enables various Features of SharePoint that are intended for team collaboration. If you are like me, this is not an appropriate setup for a public facing internet site. For this, you should be using the Publishing Site template. Here is some verbiage from Microsoft regarding some differences:
Publishing Site
Select this site template if you want to create a blank Web site and quickly publish Web pages. This template includes document and image libraries for storing Web publishing assets. Contributors can work on draft versions of pages and publish them to make them visible to readers. The site includes document and image libraries for storing Web publishing assets.
Team Site
Select this site template when you want to create a site that teams can use to create, organize, and share information. The template includes a document library, an announcements list, a calendar, a contacts list, and a links list.
What happen if you select Team site by mistake. You will get following major effect
a. Some options like Create Page, edit page, manage content and structure… etc are missing.
b. The default page doesn’t belong to page library.
c. ‘Advance Search’ option is not there.
Don’t worry, here is the solution
solution (a.)
1. Go to “Site Settings” ->”Site Collection Features”
2. Activate “Office SharePoint Server Publishing” and “Office SharePoint Server Publishing Infrastructure” (IF Available) services.
Now you will see all options in Site Action menu.
solution (b.)
3. Go to top level site: Site Action -> Create New Page
4. Select “Welcome page with summary links” option
5. Give title, description and url and click on create button.
6. Now Go to “Site Settings” ->”Site Welcome Page”
7. Browse and select “welcome page”(which you created) from “pages” library.
solution (c.)
8. Goto top level site and select “site settings” and select “Sites and workspaces” in site administration group and click on create.
9. Give title and url. Select “Search Center” template from “Enterprise” tab and create it.
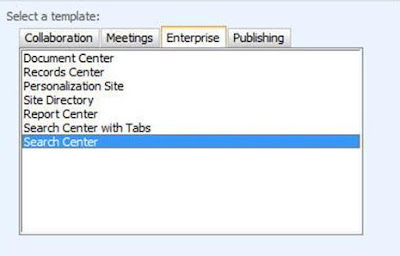
10. Now you will be redirected to search page, copy url (say URL-A).
11. In Top level, go to Site settings->Search settings (in site collection administration group)
12. Select the “Use Custom scope ….” Option and paste the url (URL-A) and remove page name from url.
For Example if your url is “http://myserver/Search/Advanced.aspx” then you have to paste
“http://myserver/Search/” only.
Now Go to Home page and Enjoy it.
When you first start using SharePoint you most likely will first have a SharePoint Team Site. This is a template that enables various Features of SharePoint that are intended for team collaboration. If you are like me, this is not an appropriate setup for a public facing internet site. For this, you should be using the Publishing Site template. Here is some verbiage from Microsoft regarding some differences:
Publishing Site
Select this site template if you want to create a blank Web site and quickly publish Web pages. This template includes document and image libraries for storing Web publishing assets. Contributors can work on draft versions of pages and publish them to make them visible to readers. The site includes document and image libraries for storing Web publishing assets.
Team Site
Select this site template when you want to create a site that teams can use to create, organize, and share information. The template includes a document library, an announcements list, a calendar, a contacts list, and a links list.
What happen if you select Team site by mistake. You will get following major effect
a. Some options like Create Page, edit page, manage content and structure… etc are missing.
b. The default page doesn’t belong to page library.
c. ‘Advance Search’ option is not there.
Don’t worry, here is the solution
solution (a.)
1. Go to “Site Settings” ->”Site Collection Features”
2. Activate “Office SharePoint Server Publishing” and “Office SharePoint Server Publishing Infrastructure” (IF Available) services.
Now you will see all options in Site Action menu.
solution (b.)
3. Go to top level site: Site Action -> Create New Page
4. Select “Welcome page with summary links” option
5. Give title, description and url and click on create button.
6. Now Go to “Site Settings” ->”Site Welcome Page”
7. Browse and select “welcome page”(which you created) from “pages” library.
solution (c.)
8. Goto top level site and select “site settings” and select “Sites and workspaces” in site administration group and click on create.
9. Give title and url. Select “Search Center” template from “Enterprise” tab and create it.

10. Now you will be redirected to search page, copy url (say URL-A).
11. In Top level, go to Site settings->Search settings (in site collection administration group)
12. Select the “Use Custom scope ….” Option and paste the url (URL-A) and remove page name from url.
For Example if your url is “http://myserver/Search/Advanced.aspx” then you have to paste
“http://myserver/Search/” only.
Now Go to Home page and Enjoy it.
How to schedule MOSS 2007 backup
Tags:
MOSS 2007,
Sharepoint
MOSS 2007 doesn't provide scheduling for backup.You can schedule backup following these steps.
1. Set path of stsadm.exe
My computer -> Right click ->properties-> Advanced ->Environment Variables->system variable ->select “path” -> click edit
Put ; after existing path and give path of stsadm.exe Generally it is
C:\Program Files\Common Files\Microsoft Shared\web server extensions\12\BIN\
Click ok, type stsadm in command prompt you should be able to access it without having to go through the trouble of navigating to the SharePoint BIN folder.
We will use following command to perform backup
stsadm.exe -o backup -directory "\\Backup Folder " -backupmethod full -item "Farm" –overwrite
2. If your database server is different from MOSS server then you need to
>> share backup folder in MOSS Server and give folder write access to the user that runs backup command and that has permission to run other sharepoint services.
>> Verify that the MSSQLServer service on database server is started under a domain account that has write access to both the Server share and its underlying partition. Click here to configure domain account in Sql server services.
3. Assuming your backup folder is c:\backup and your MOSS server name is “server” then create a batch file and type following
------------------------------------------------------------------------------------
cd\
cd C:\backup
rd %date:~10,4%-%date:~4,2%-%date:~7,2% /s/q
md %date:~10,4%-%date:~4,2%-%date:~7,2%
stsadm.exe -o backup -directory "\\server\Backup\%date:~10,4%-%date:~4,2%-%date:~7,2%" -backupmethod full -item "Farm" –overwrite
------------------------------------------------------------------------------------
It will create date wise folder (yyyy-MM-dd) and put backup in it.
change folder path in batch file as per your requirement.
4. Run batch file to confirm everything is okay. If you get following error:
Error: Object SharePoint_Config failed in event OnBackup. For more information, see the error log located in the backup directory. SqlException: Cannot open backup device '\\server\backup\spbr0001\0000001.bak'. Operating system error 5(error not found).
Then configure sql server services to domain account. Click here to see it.
5. For Scheduling:
>> open control panel -> Scheduled Tasks ->Add scheduled Task
>> Select batch file and schedule type – daily
>> Give time
>> Enter user info
>> Click finish
1. Set path of stsadm.exe
My computer -> Right click ->properties-> Advanced ->Environment Variables->system variable ->select “path” -> click edit
Put ; after existing path and give path of stsadm.exe Generally it is
C:\Program Files\Common Files\Microsoft Shared\web server extensions\12\BIN\
Click ok, type stsadm in command prompt you should be able to access it without having to go through the trouble of navigating to the SharePoint BIN folder.
We will use following command to perform backup
stsadm.exe -o backup -directory "\\Backup Folder " -backupmethod full -item "Farm" –overwrite
2. If your database server is different from MOSS server then you need to
>> share backup folder in MOSS Server and give folder write access to the user that runs backup command and that has permission to run other sharepoint services.
>> Verify that the MSSQLServer service on database server is started under a domain account that has write access to both the Server share and its underlying partition. Click here to configure domain account in Sql server services.
3. Assuming your backup folder is c:\backup and your MOSS server name is “server” then create a batch file and type following
------------------------------------------------------------------------------------
cd\
cd C:\backup
rd %date:~10,4%-%date:~4,2%-%date:~7,2% /s/q
md %date:~10,4%-%date:~4,2%-%date:~7,2%
stsadm.exe -o backup -directory "\\server\Backup\%date:~10,4%-%date:~4,2%-%date:~7,2%" -backupmethod full -item "Farm" –overwrite
------------------------------------------------------------------------------------
It will create date wise folder (yyyy-MM-dd) and put backup in it.
change folder path in batch file as per your requirement.
4. Run batch file to confirm everything is okay. If you get following error:
Error: Object SharePoint_Config failed in event OnBackup. For more information, see the error log located in the backup directory. SqlException: Cannot open backup device '\\server\backup\spbr0001\0000001.bak'. Operating system error 5(error not found).
Then configure sql server services to domain account. Click here to see it.
5. For Scheduling:
>> open control panel -> Scheduled Tasks ->Add scheduled Task
>> Select batch file and schedule type – daily
>> Give time
>> Enter user info
>> Click finish
Saving infopath forms to sql server
Tags:
InfoPath,
MOSS 2007,
Sharepoint
Our object is to save infopath form in the SQL server. For this:
1. Create store proc which accepts parameters for saving (Inserting and updating) data and return ID (Primary Key)field value.
2. Create webservice which accept parameters in the form of string and datetime only and convert it into appropriate form(like string to int/Boolean/decimal whatever type of parameters in stored proc) with validation and pass into stored proc to save data. If id= -1 then insert else update process will happen.
3. Create infopath form using this webservice. (click here to see how to create webservice based infopath form)
4. Design form and Drag Primary ID field, set its default value = -1 for insertion and set its width = 1px to prevent from user interaction. As in stored proc If id= -1 then insertion takes place else updating.
5. If you want to submit it in MOSS, see here and publish it.
1. Create store proc which accepts parameters for saving (Inserting and updating) data and return ID (Primary Key)field value.
2. Create webservice which accept parameters in the form of string and datetime only and convert it into appropriate form(like string to int/Boolean/decimal whatever type of parameters in stored proc) with validation and pass into stored proc to save data. If id= -1 then insert else update process will happen.
3. Create infopath form using this webservice. (click here to see how to create webservice based infopath form)
4. Design form and Drag Primary ID field, set its default value = -1 for insertion and set its width = 1px to prevent from user interaction. As in stored proc If id= -1 then insertion takes place else updating.
5. If you want to submit it in MOSS, see here and publish it.
Submit webservice based infopath form to MOSS 2007
Tags:
InfoPath,
MOSS 2007,
Sharepoint
1. Create infopath form as per my previous post
2. Click on tools -> data connections -> add
Select “Create a new connection to ” and “submit data” and click Next
3. Select “To a document Library or a sharepoint site” and click Next
4. Now Give the url of Document library without “forms/allitems.aspx”,Give File Name with concat of ID so that it will be unique and select “Allow Overwrite if file exists” for editing feature and click Next.

5. Give the name of this connection and click finish.
6. Add a button in form and right click and set properties:
Select Action “Rules and Custom Code” and click on Rules… -> Add
In Rule1 add following 3 actions
--Query using data connection(Receive webservice connection)
--Set field value PrimaryKey ID field = Data field-> save response->save result
--Submit using a dataconnection -> select sharepoint library submit (Not webservice submit)
Now add one more rule to close this form
Rules -> Add
Rule2:
Close this form.
7. Now form is ready to publish.
2. Click on tools -> data connections -> add
Select “Create a new connection to ” and “submit data” and click Next
3. Select “To a document Library or a sharepoint site” and click Next
4. Now Give the url of Document library without “forms/allitems.aspx”,Give File Name with concat of ID so that it will be unique and select “Allow Overwrite if file exists” for editing feature and click Next.

5. Give the name of this connection and click finish.
6. Add a button in form and right click and set properties:
Select Action “Rules and Custom Code” and click on Rules… -> Add
In Rule1 add following 3 actions
--Query using data connection(Receive webservice connection)
--Set field value PrimaryKey ID field = Data field-> save response->save result
--Submit using a dataconnection -> select sharepoint library submit (Not webservice submit)
Now add one more rule to close this form
Rules -> Add
Rule2:
Close this form.
7. Now form is ready to publish.