During editing tasks in SharePoint designer workflow for the form library, there is an option ‘Related List Item’. It will open form as an xml or asking to save it, not as a browser compatible infopath form.
we will use Query Parameters to Invoke Browser-Enabled InfoPath Forms
Suppose your form URL is
http://ServerName/sites/SiteCollection/FormLibrary/Form1.xml
If we write
http://ServerName/sites/SiteCollection/FormLibrary/Form1.xml?OpenIn=Browser
then it will automatically go to following link which is browser enabled infopath form
http://ServerName/sites/SiteCollection/_layouts/FormServer.aspx?XmlLocation=~sitecollection/FormLibrary/Form1.xml&OpenIn=Browser
To do this, open task page in sharepoint designer and search “Related list item:”, you will get
<td class="ms-formlabel" valign="top" nowrap="true" width="25%"><b>Related list item:</b></td><td class="ms-formbody" valign="top" width="75%"><a href="{substring-before(@WorkflowLink, ', ')}"><xsl:value-of select="substring-after(@WorkflowLink, ', ')"></xsl:value-of></a></td>
Replace
href="{substring-before(@WorkflowLink, ', ')}"
to
href="{substring-before(@WorkflowLink,',')}?OpenIn=Browser"
If you want to send form link in the email then do following to make link browser enabled infopath
Click “Add Lookup to Body” in “send to mail” action in SharePoint designer workflow, Select “Current Item” as source and “Encoded Absolute URL” as Field and put “?OpenIn=Browser” just after it.
See following link for more detail to use Query Parameters to Invoke Browser-Enabled InfoPath Forms
http://msdn.microsoft.com/en-us/library/ms772417.aspx
Showing posts with label InfoPath. Show all posts
Showing posts with label InfoPath. Show all posts
Submit infopath form to MOSS 2007 form library using web service
Tags:
InfoPath,
MOSS 2007,
Sharepoint
Object:
1. Submit infopath form to sharepoint form library using code, so that custom validations can be implemented.
2. The submitted file name should be based on one of its internal field which would be unique.
3. File should be editable
Here are the basic steps to do this.
Step1: Create a Form Library in MOSS 2007 and go to settings > Form library settings > Advance settings> Select “Allow management of content types” yes and “display as a web page option” and Click ok.
Step 2: Create a web service and add following methods
Step 3: You need to set following parameter in the code
1. fieldName (in Save Method): Submitted File name is based on this field value. If it is null then new GUID will be used.
Step 4: Open infopath app click File > Design a Form Template
Select Form Template, Blank options and Check “Enable Browser-Compatible Features only” option and click OK.
Step 5: Draw layout, Add Controls and validation as per requirement.
Step 6: Tools > Data Connection > Add
Select “Create a new connection to” and “submit data” and Click Next.
Select “To a web service” option and Click Next
Give webservice url and Click Next
Select Save method and Click Next
Select Parameter, “Entire Form” option and “Submit Data as string” option

Click Next
Give Connection name and click Finish.
Note: This web service is deployed with MOSS services or this form is deployed in full trust mode then no problem else you need to convert data connection to UDCX files. For this, Tools> Data Connections >Select Connection > Click Convert button and give data connection url and Click OK.
Step 7: Tools > Submit options
Set “Allow users to submit this form” true, Select web service option from dropdown and Select Data connection which we made as per following image.

Click Advance button > Select “Close the form” in After submit option Click OK.
Step 8: File > Publish
Select “To a sharepoint server with or without form services” and click next
Give url of form library excluding “forms/allitems.aspx” and click next
Select “Enable this form to be filled out by using a browser” (Assume Domain level security in tools > form options>Security and trusts) Select Document Library and click Next.
Select Update the form template … option and select form library and click next
Add column names and click next
Click Publish button and close
Open Form Library and enjoy it.
1. Submit infopath form to sharepoint form library using code, so that custom validations can be implemented.
2. The submitted file name should be based on one of its internal field which would be unique.
3. File should be editable
Here are the basic steps to do this.
Step1: Create a Form Library in MOSS 2007 and go to settings > Form library settings > Advance settings> Select “Allow management of content types” yes and “display as a web page option” and Click ok.
Step 2: Create a web service and add following methods
[WebMethod]
    public string Save(string strdoc)
    {

        try
        {
            string fieldName = "f1";
            // Use elevated privileges so anonymous users can upload through
            // this service.
            SPSecurity.RunWithElevatedPrivileges(delegate { SubmitToSPLibrary(strdoc, fieldName); });
            return "";
        }
        catch (Exception ex)
        {
            Log(ex.ToString());
            return "error";
        }

    }
    public void Log(string str)
    {
        StreamWriter Tex = File.AppendText("c:\\Backuplog.txt");
        Tex.WriteLine(DateTime.Now.ToString() + " " + str);
        Tex.Close();
    }
    private void SubmitToSPLibrary(string formData, string field)
    {
        string namespaceURI = "";
        try
        {
            // With the form data submitted to this web service, we now
            // need to find the location for submitting list data.
            XmlDocument xmlDoc = new XmlDocument();
            xmlDoc.LoadXml(formData);
            //Get the namespace
            Match mn = Regex.Match(formData, "my=\"(.+?)\"");
            if (mn.Success && mn.Groups.Count > 1)
            {
                namespaceURI = mn.Groups[1].Value;
            }

            // Get the XSN location
            XmlProcessingInstruction pi =
               (XmlProcessingInstruction)xmlDoc.SelectSingleNode("/processing-instruction(\"mso-infoPathSolution\")");

            if (null != pi && !String.IsNullOrEmpty(pi.Value))
            {
                Match m = Regex.Match(pi.Value, "href=\"(.+?)\"");
                if (m.Success && m.Groups.Count > 1)
                {
                    string xsnLoc = m.Groups[1].Value;
                    if (!xsnLoc.StartsWith("http", StringComparison.OrdinalIgnoreCase) || !xsnLoc.ToLower().Contains("/forms/"))

                        throw new Exception("XSN location is not a published InfoPath document library.");

                    // Open the site and web, try to get the list.
                    Log("Site Address: " + xsnLoc);
                    using (SPSite site = new SPSite(xsnLoc))
                    {
                        using (SPWeb web = site.OpenWeb())
                        {
                            web.AllowUnsafeUpdates = true;
                            string libLoc = xsnLoc.Substring(0, xsnLoc.LastIndexOf("/Forms/"));
                            Log("Library Address: " + libLoc);

                            // Upload form data to the library.
                            SPFolder folder = web.GetFolder(libLoc);
                            if (null == folder)
                                throw new Exception("Cannot find the InfoPath document library root folder.");

                            UTF32Encoding encoder = new UTF32Encoding();
                            byte[] data = encoder.GetBytes(formData);

                            //Get File Name
                            XmlNodeList list = xmlDoc.GetElementsByTagName(field, namespaceURI);

                            string fileName = "";
                            foreach (XmlNode node in list)
                            {
                                fileName = node.InnerText;
                            }
                            if (fileName.Trim().Length > 0)
                            {
                                    //Add New File OR Update Existing one.
                                    folder.Files.Add(String.Format("{0}/{1}.xml", libLoc, fileName), data ,true);
                                    Log("Added Successfully.");
                            }
                            else
                            {
                                folder.Files.Add(String.Format("{0}/{1}.xml", libLoc, Guid.NewGuid()), data);
                            }
                            web.AllowUnsafeUpdates = false;
                        }

                    }

                }

            }

        }

        catch (Exception ex)
        {
            throw new Exception("Failed to upload form data", ex);
        }

    }
Step 3: You need to set following parameter in the code
1. fieldName (in Save Method): Submitted File name is based on this field value. If it is null then new GUID will be used.
Step 4: Open infopath app click File > Design a Form Template
Select Form Template, Blank options and Check “Enable Browser-Compatible Features only” option and click OK.
Step 5: Draw layout, Add Controls and validation as per requirement.
Step 6: Tools > Data Connection > Add
Select “Create a new connection to” and “submit data” and Click Next.
Select “To a web service” option and Click Next
Give webservice url and Click Next
Select Save method and Click Next
Select Parameter, “Entire Form” option and “Submit Data as string” option

Click Next
Give Connection name and click Finish.
Note: This web service is deployed with MOSS services or this form is deployed in full trust mode then no problem else you need to convert data connection to UDCX files. For this, Tools> Data Connections >Select Connection > Click Convert button and give data connection url and Click OK.
Step 7: Tools > Submit options
Set “Allow users to submit this form” true, Select web service option from dropdown and Select Data connection which we made as per following image.

Click Advance button > Select “Close the form” in After submit option Click OK.
Step 8: File > Publish
Select “To a sharepoint server with or without form services” and click next
Give url of form library excluding “forms/allitems.aspx” and click next
Select “Enable this form to be filled out by using a browser” (Assume Domain level security in tools > form options>Security and trusts) Select Document Library and click Next.
Select Update the form template … option and select form library and click next
Add column names and click next
Click Publish button and close
Open Form Library and enjoy it.
Saving infopath forms to sql server
Tags:
InfoPath,
MOSS 2007,
Sharepoint
Our object is to save infopath form in the SQL server. For this:
1. Create store proc which accepts parameters for saving (Inserting and updating) data and return ID (Primary Key)field value.
2. Create webservice which accept parameters in the form of string and datetime only and convert it into appropriate form(like string to int/Boolean/decimal whatever type of parameters in stored proc) with validation and pass into stored proc to save data. If id= -1 then insert else update process will happen.
3. Create infopath form using this webservice. (click here to see how to create webservice based infopath form)
4. Design form and Drag Primary ID field, set its default value = -1 for insertion and set its width = 1px to prevent from user interaction. As in stored proc If id= -1 then insertion takes place else updating.
5. If you want to submit it in MOSS, see here and publish it.
Submit webservice based infopath form to MOSS 2007
Tags:
InfoPath,
MOSS 2007,
Sharepoint
1. Create infopath form as per my previous post
2. Click on tools -> data connections -> add
Select “Create a new connection to ” and “submit data” and click Next
3. Select “To a document Library or a sharepoint site” and click Next
4. Now Give the url of Document library without “forms/allitems.aspx”,Give File Name with concat of ID so that it will be unique and select “Allow Overwrite if file exists” for editing feature and click Next.

5. Give the name of this connection and click finish.
6. Add a button in form and right click and set properties:
Select Action “Rules and Custom Code” and click on Rules… -> Add
In Rule1 add following 3 actions
--Query using data connection(Receive webservice connection)
--Set field value PrimaryKey ID field = Data field-> save response->save result
--Submit using a dataconnection -> select sharepoint library submit (Not webservice submit)
Now add one more rule to close this form
Rules -> Add
Rule2:
Close this form.
7. Now form is ready to publish.
Web service based Infopath form
Tags:
InfoPath,
MOSS 2007,
Sharepoint
Our object is to use Webservice which takes parameter from infopath template, process the parameters and return a parameter.
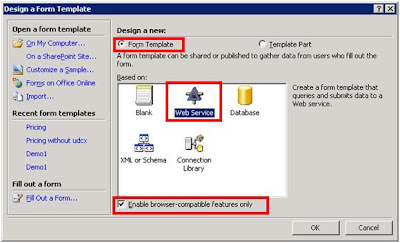
1. Open Infopath:
Select Form Template -> Web Service
Check Enable browser-compatible features only and click OK.
2. Select Receive and submit data and click on Next
3. Give WebService URL and click Next
4. Select an operation for retrieving data and click next
5. Give Nameof data connection for retrieving data and click next.
6. Now give url of webservice for submit data connection and click next
7. Select an operation for submitting and click next
8. Map each parameters from field or Group.
(Select parameter one by one and select field or group option for each parameter)
And click next.
9. Give name for submit dataconnection.
10. You will see all fields in right side data source toolbar, Drag these fields and make layout in infopath form.
So Two dataconnections are created
first to receive from webservice and
second submit to webservice.
We will use them in next phase.
1. Open Infopath:
Select Form Template -> Web Service
Check Enable browser-compatible features only and click OK.

2. Select Receive and submit data and click on Next
3. Give WebService URL and click Next
4. Select an operation for retrieving data and click next
5. Give Nameof data connection for retrieving data and click next.
6. Now give url of webservice for submit data connection and click next
7. Select an operation for submitting and click next
8. Map each parameters from field or Group.
(Select parameter one by one and select field or group option for each parameter)
And click next.
9. Give name for submit dataconnection.
10. You will see all fields in right side data source toolbar, Drag these fields and make layout in infopath form.
So Two dataconnections are created
first to receive from webservice and
second submit to webservice.
We will use them in next phase.